
SUMMARY
- Step 1 : Access the creation menu for OpenID client
- Step 2 : Configure the basic parameters
- Step 3 : Retrieve the client ID and the metadata URL from the server
- Step 4 : Configure the disconnect
- Step 5 : Create the client secret
Implementation
Step 1 : Access the creation menu for OpenID client
- In the Azure AD administration panel, select the App registrations menu
- Click on New registration

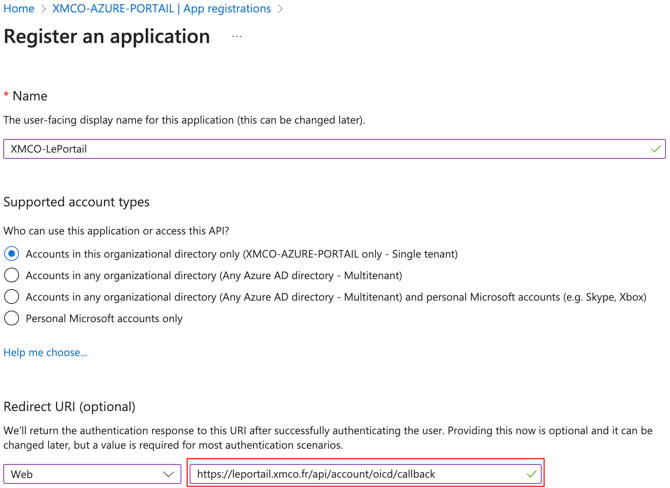
Step 2 : Configure the basic parameters
- Fill in a name for the OpenID client, for example : XMCO - Le Portail
- Fill in the allowed redirect URI
- Choose Web type
- Enter the following URI : https://leportail.xmco.fr/api/account/oicd/callback
- Click on Register
Step 3 : Retrieve the client ID and the metadata URL from the server
- Note the Client ID that is referenced Application (client) ID
- Click the Endpoints button and note the URL for OpenID Connect metadata document. These informations will need to be provided to our teams.

Step 4 : Configure the disconnect
- Click on the following link next to Redirect URIs

- Configure the front-channel logout URL : https://leportail.xmco.fr/api/account/oicd/logged_out
- Save the configuration

This URL will be used during the user logout process.
Step 5 : Create the client secret
- In the Microsoft menu, navigate to Certificates & secrets
- Click on New client secret

- (Optionnal) Add an description
- Choose an expiration date that matches your company's policy
- Click on Add

- Note the customer secret corresponding to the Value column (not Secret ID). This value has to be provided to our teams.

Warning: When the secret expires, the authentication in the XMCO Portal will no longer be functional. It will be necessary to communicate us a new secret.